I just wanted to do a special post that is kind of hard for me to do. Here is the before and after pictures of me of my transition.
Thursday, July 28, 2022
Tuesday, July 26, 2022
My transition update
Well it's been a long time seance I made an update on my transition here. I was reading an older post about how I was feeling about my breast growth back in 2014.
How things have changed and how I feel seance my gender Confirming surgery last year. Well so many physical changes seance 2014. My breasts have surprised what I was feeling back then there now a 32G and I love them more so now then back then.
Yes to the point I still grab them, and my body even turns me on in ways I never imagined. I'm so glad there not small any more, less dysphoria and there so comferting to have for me to have is a comfort that's hard to explain well with in itself.

This is how I look as of today July 26, 2022.
Friday, July 13, 2018
Wands 9 and 10
OK here is wand nine its the same wood as the last thorn less honey locust.
like always I remove the bark with a chisel.I then Wanted the handle
to be more flatter so I used a chisel, and a Dremel tool to carve it out.


I did the same with the tip and the handle using the cement on the porch,
to shape and round it off and a Dremel tool as well. Then sand paper and
I sanded the wand to its final sanding. The angel on the handle was from
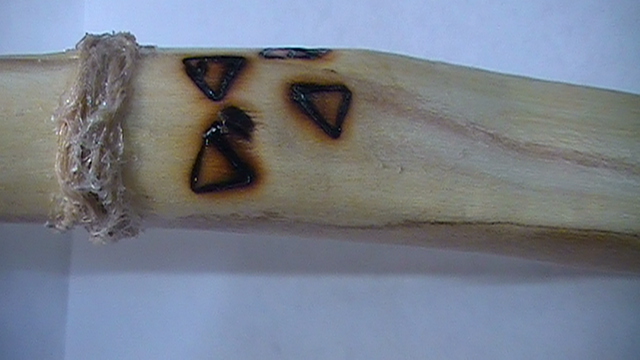
how I cut it off. I then was thinking of burning some designs into the wand,
it was my first time wood burning and part of it wasn't aligned. I did the four
elements first, as you an see the water symbol is off slightly.


I then couldn't decide what other symbol to do on the wand but
the infinity/finger eight kept coming to mind and to put it towards
the tip. So I used a stencil to help draw it on then I free handed over
that whit a wood burning tool from Michaels.


Then I coated it with two cats of scolpy glaze to protect it.
the wand wasn't finished but it took over a month before it
came to mind. Yes I'm going to say this I was siting well sometimes
this is where you get inspiration. Well I was siting on the toilet doing
my thing and it came to my mind. to wrap twin around the wand,
from the elemental symbols to the infinity/figure eight. In an x
shape up the wand top and bottom I let the wrapping the wand decide how
it should be. I dried fitted it keeping extra so I knew I had enough. I ended
up after the infinity symbol. I glued it on with E6000. And two coats of
modpodge to protect it and lay down the frayed edged.


Ok here is wand number ten the wood is also from the same tree
a thorn less honey locust. I liked this one because how it looked.
on the handle how it splits into two other branches. I striped
the bark as normal with a chisel. Used the cement on the porch
Dremel tool and sand paper to round off the edges.I used washable
markers to do the coloring. I wanted it dark blue then light blue.
well kind of like the Kingdome hearts birth by sleep loading screen
heart. But the dark blue marker I was using was almost out and
went light blue. So I grabbed a different one, so the tip to the handle
ended up light blue then dark blue down the wand. I noticed it was
translucent enough for the wood to still show through, witch made it
more beautiful. I then coated it with two coats of scolpy glaze.


As you can see the things hanging from it, there beads I made
from scolpy polymer clay. purple and silver and the silver is sparkly
and swirly dark parts all around it. There also coated in scolpy glaze.
I used beading thread tied several knots in one spot to hold the beads on.
I used the metal part of a small twisty tie to help feed it through the beads.
it was tricky but I put a knot on top of the beads as well, to keep them
from sliding. Words of advise when I ties the beading thread to the handle,
after the beads where set I didn't have long enough thread to tie it on. So
it was difficult tying the first one on the shooter one. The second one was
easier with the length. As you can see the colors are the opposite of each other.
I finished this one before I finished wand number 9.
Monday, June 25, 2018
wand number 8
Ok like all my wands I start out by removing the bark with a chisel.
This peace after cutting it off of the long stick is kind of bent more then
the rest. what I was trying to do in the middle was make it rounded like a
ball. I tapered the front first then used the cement on the porch to
help round the tip sand paper and a Dremel tool as well. Also
the end of the handle as well, and the shape of the handle end
came cutting it off uneven.
the end of the handle as well, and the shape of the handle end
came cutting it off uneven.


this top one is the tip of the wand the bottom one is the end
of the handle.

Then I sanded the front of the wand with a Dremel tool and sand paper, then
I made the handle a little bit smaller to allow the middle to be more rounded.
I then sanded the handle with a Dremel tool and sand paper. Then I drew on
a swirl line on the handle from the end to the middle. I used a Dremel tool
to carve it out.

 I then used a candle to burn the handle of the wand where it was dremeled out.
I cleaned up in-between where it wasn't carved the best I could. Then I coated it
with two coats of scolpy glaze to protect it and keep the birnt part from coming off.
I then added rapped green twine with a longer part to hang something on it.
I made a pentacle out of scolpy polymer clay. Its the same on each side I used
a scrap peace of an eye pin to line it out, after making it round and flatter
The color I used was red purl and put a eye pin trough the middle of
it to hang, And used E600 to secure it in. I tried different ways to secure the
twine and hold the pentacle on. But the twine broke so I used a scrap peace
of an eye pin to sandwich it hold it all tougher.


I then sanded the handle with a Dremel tool and sand paper. Then I drew on
a swirl line on the handle from the end to the middle. I used a Dremel tool
to carve it out.

I cleaned up in-between where it wasn't carved the best I could. Then I coated it
with two coats of scolpy glaze to protect it and keep the birnt part from coming off.
I then added rapped green twine with a longer part to hang something on it.
I made a pentacle out of scolpy polymer clay. Its the same on each side I used
a scrap peace of an eye pin to line it out, after making it round and flatter
The color I used was red purl and put a eye pin trough the middle of
it to hang, And used E600 to secure it in. I tried different ways to secure the
twine and hold the pentacle on. But the twine broke so I used a scrap peace
of an eye pin to sandwich it hold it all tougher.


Tuesday, May 29, 2018
Wand number 7
Ok this is the seventh wand I have made I started by removing the bark with
a chisel. The wood I used is a thorn less hunny locust its the second part of
wands number 6,8,9. Wands 6,7,8,9 are all cut from the same long stick.
And when I got to the handle of the wand I liked the pattern it made so
I left the rest of the bark on. I also used the dremel tool to help sand the knots
after using the chisel. The end of the handle I got the shape by the way it wasn't cut
unevenly. I then used the cement on the porch a dremel tool and sand pepper to shape
and round the edges. I sanded it as close to the final sanding as possible.
As I was holding the wand I thought it needs a swirl in it.


I put regular clear tape around the wand from the handle to the tip,
I then traced around it. I then used a dremel tool to sand out the shape.
I then used sand paper to finish the final sanding. I then coated it with
two coats of scolpy glaze and then it was finished. The next images are
the twist in the wand from the handle to the tip of the wand.


Subscribe to:
Posts (Atom)