Tuesday, May 29, 2018

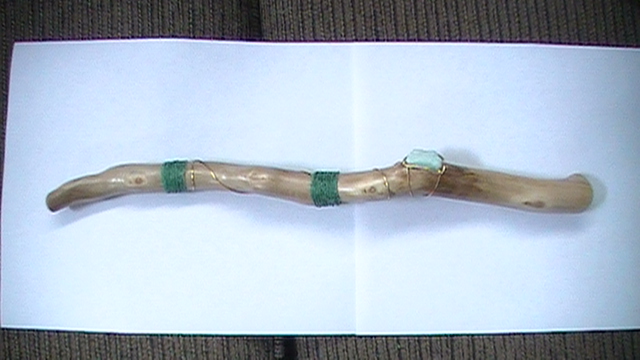
Wand number 7

Ok this is the seventh wand I have made I started by removing the bark with
a chisel. The wood I used is a thorn less hunny locust its the second part of
wands number 6,8,9. Wands 6,7,8,9 are all cut from the same long stick.
And when I got to the handle of the wand I liked the pattern it made so
I left the rest of the bark on. I also used the dremel tool to help sand the knots
after using the chisel. The end of the handle I got the shape by the way it wasn't cut
unevenly. I then used the cement on the porch a dremel tool and sand pepper to shape
and round the edges. I sanded it as close to the final sanding as possible.
As I was holding the wand I thought it needs a swirl in it.


I put regular clear tape around the wand from the handle to the tip,
I then traced around it. I then used a dremel tool to sand out the shape.
I then used sand paper to finish the final sanding. I then coated it with
two coats of scolpy glaze and then it was finished. The next images are
the twist in the wand from the handle to the tip of the wand.


Wednesday, May 23, 2018

My fifth and sixth wands

Ok here is my newest finished wands the first wand is my personal healing wand.
ok the wood is Quaky Aspin, the bark came off easily and the bark that didn't I
scraped it off with a chisel. I then sanded it by hand. And left part of a knot in
to have a place to put a healing stone.
I then took a pencil and traced around the Aquamarine stone I ended up
choosing for the wand. Then I used a dremel tool to go over the line, I
then proceeded to use a chisel out a space for the crystal. I ended up
chapping a peace off the back end towards the handle of the wand where
the stone goes into. I reattached it with ice resin put rubber bands to hold it
on intel it set. I made sure the inside was flat for the stone to sit in. I wend in
with the dremel tool tell the Aquamarine crystal/stone sat snugly in part way.
I then used E600 to glut it in only going around the edge of the Aquamarine,
so the stone still touched the wood making a good contact with out interference
from the glue.

I then used scolpy glaze to cote the wand making sure I didn't get it on the stone.
I then used al all to make a hole as you can see to the right of the stone. I then put the
non tarnish brass in the hole and bent the wire then I proceeded to wrap the wire around
the stone. the underneath is in an X shape so its secured to each corner of the wire.
And then I came out the front of the stone and continued to wrap the wire around the wand.
 
Then I made sure the wire was tight around the wand, as you can see I wrapped
the wire around its self making sure I had I long enough peace left in the front.
I then made a whole with an all and bent the wire inside it to secure it. And the force of it
held it in, but right at the top of the whole I used E600 just to make sure it wasn't coming out.
And same as the first whole I made as well. I then proceeded to wrap green twine around
two spots making sure there was no glue in the wire at all, As you can see it helped secure
the front of the wire in as well. I coted the twine with modpodge two cotes. To secure the
frayed parts down and make it more smooth.


The last four images are the end of the wand as I was cutting the wood it went off center.
And there was a knot there as well so that's what gave that shape. I also rounded the edges of the handle and the tip of the wand so it more smooth and not sharp rough looking edges.
So that's my healing wand my fifth wand I ever made.
 
 
This next wand I call it the key wand. this one is made from a thorn less hunny locust.
as I was striping the bark off with a chisel some of it was chipping away. I noticed this
was part of the branch that was dyeing and it was like there was saw dust in it. I then
proceeded to further remove the bark to get all of it out. I then sanded the wand and rounded
off the edges of the handle and tip of the wand. In the grooves that was left I decided to put
in some it glow in the dark crayon. I used purple and kind of a fuchsia hot pink color. I
just used a stick lighter and a tooth pick from the shavings to put it in the groves.


I them mixed scolpy glaze with embossing powder green, gold, and blue.
the blue kind of took over. But it is sparkly in the right lighting
I did about two coats of that then about three or so cats of just clear, to
make sure it was covered and the embossing powder was secured in it.

I then rapped help cord around the handle using E600 to secure it in place.
them modpodge over that to finish it off.

As you can see that is where a knot was and I didn't cut it straight. Also you can
see the embossing powder as well.
 
I then tied a key to a red sparkly ribbon I raped and tied a bow.
And it is secured down with E600.


As you can see it is a wind up key. I glued the not with modpodge to make sure
the knot wouldn't come in dune also the end of the ribbon to prevent fraying.
I even coated the key as well to protect it as well. The next images is heard to see
but its the glowing of the crayon Crayola to be exact I had séance I was a little
kid. So that's my finished sixth wand.


Wednesday, April 18, 2018

My finished 4th wand

I suggest reading my post about my 4 wands first before
reading this one. The part on how I made this wand to
this point. Ok at this point I used polymer clay glaze
two coats on the leafs scolpy brand. Then I started to paint
the stem part of the rose with a purple water color, because
that's  all I have at the moment. It was kind of heard to do
because water colors don't stick to wood very well. I thickly
dried brushed it on the best I could and touched it up along the
way. Then every wear the stem wasn't I used the paint brush,
and my finger to touch up around the stem. Removing excess
water color. Then I used the same glaze over the purple,
also I mixing the purple water color in with some of the
glaze. It helps to add color because the glaze was, pulling
up the water color in some spots. After all of the purple was
covered with two coats and touched up where needed. I
did the rest of the wand with the same glaze, with a couple
of coats as well. then it was ready to use with in an hour.
and fully cured with in 24 hours.


Steampunk Sun Pendent

So I got the Idea for doing this from one of me cards in my Tarot deck.
The steampunk Tarot By Barbra Moore, it was the sun card.
I needed the polymer clay tell it was workable, then rolled it in a ball.
I then started flattening it out while keeping it round shape. I then took the
gears and squished them together one on each side, doing so adhered
them to the clay. Then I used an eye pin to shape the edges then after
it was shaped, I trimmed the eye pin and inserted it into the end that
was going to be the top. I placed it on aluminum foil and backed
according to the instructions but dubbled the time. And as it was baking I
tied 3 peace's of hemp cord to one half of the clasp, then braded it the
 tied the other end to the other half of the clasp. I then used modpodge
to seal the ends of the hemp cord and the clasp to protect the finish.
And to help  it to not come untied, then after the clay was done
baking, I added a jump ring to the eye pin and placed it onto the cord.
And started to wear it immediately.
The silver gear is the front of the pendent
and the copper is the back of the pendent.

Tuesday, March 6, 2018

My persional Tarot Journal

Well I started learning hoe to read Tarot cards two months ago.
 As I was learning I wanted a PDF of the book my deck came with.
So I was looking for a site I didn't have to sign up on in order to
download the book. The cards I got was The Steampunk Tarot
By Barbra Moor illustrated by Allie Fell. As I was searching
I came across a podcast on the Biddy Tarot Site featuring
Barbra Moor. Biddy Tarot Podcast 47 Tarot made easy
with Barbra Moore. And as I went through the site I learned
about a Tarot Journal, I didn't have one and I didn't want to
get a cheep one or even a fancy expensive one. It came
to mind I have the stuff to make one and it would be more
personalized, a more connection with the journal. So
I took a romaine box cut it out bent it to shape, then I
mod podge blank paper to the cardboard. I then used distressed
ink by Tim Holtz, I used lavender and piled pain witch
piled paint is a green color. I added a label to the front and labeled
it Tarot Journal. I put another label on the inside with my name,
so that it is customized to me and my energies. then I coated it
with two coats of mod podge. Then I cut and sized the blank paper
for the journal. Then I glued the paper in with a red ribbon as a book mark
with spray mount and mod podge, at the top and bottom of the inner spine
agents the paper. I glued a white and purple string in place with E600, to help it look
more finished.
This is the front of the journal.
This is the back or the journal the back
inside looks pretty much the same.

Here is the inside front of the Journal
with the label with my name on it.
I got the free labels at